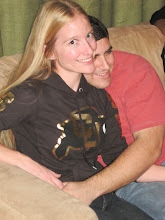
I decided our original wedding website did not really fit the theme of the celebration we've been planning and decided to overhaul the whole thing. Unfortunately, the Knot did not offer the perfect shades of green, champagne, and purple with white calla lilies. But I was able to create a sweet little website that goes with our personalities and the style of the wedding.
In addition to updating the website theme, I included photos from our Engagement Session, updated hotel information, and new Registry information. Now that the Save the Dates have been mailed, our invitees will be perusing the wedding info. This notion encouraged me to get on the ball & update our site!
Monday, November 23, 2009
Save the Dates
It's official: our Save the Dates have gone out! I cannot wait to see the finished products! We decided to go with two versions - a close-up and a standing shot. The Save the Dates are magnets with all the important information (I'll actually post them later) and they were sent out with this sweet little stamp:
Hopefully our families will let us know soon if they can make our exciting day! We cut the guest list down to 109 (!!) people and we are allowed to have 100 people at the venue. It would have been so nice to invite everyone we wanted to, but the reception costs are definitely prohibitive. Even though we'd originally planned to only invite family, Rich and I stretched our invite list a little and have been able to include several close friends on our list. We plan on having a reception in Denver for our local friends who couldn't make the trek to Boise.Friday, November 13, 2009
DIY Project: Coasters!
I came across this wonderful DIY coaster project on Style Me Pretty and can't wait to start!


(Source)
Materials- Square ceramic tiles
- Decoupage like Mod Podge
- Paper
- Foam Brushes
- Felt or rolls of thin cork board for backing coasters
- Paper cutter
- Heavy duty glue
- Ribbon or raffia for tying
- Waterproof acrylic sealer for spray or paint can
Instructions
- Clean tiles with alcohol to remove smudges/fingerprints. Be sure you are working on non-stick surface or vinyl.
- Cut paper into squares 1/4" smaller than tile. Have a stack cut to expedite the process.
- Brush the tile with decoupage glue. Use a generous coat, since you want all parts of the paper to bond permanently. You must work quickly, as it begins drying immediately. Decoupage glue is not very forgiving.
- Center the paper on tile. Press paper to the tile firmly, beginning in the middle and working your way outwards, eliminating air bubbles. Pay extra attention to the edges. These must adhere well, otherwise the paper will peel. Allow this layer to dry, 10 to 15 minutes.
- Apply a layer of decoupage glue to the top of the paper. Make sure your brushstrokes are uniform and run in only one direction, as you will be able to see them lightly when the glue dries. Allow this layer to dry 15 to 20 minutes.

(Source)
- Brush another layer of decoupage glue over the coaster. You can make your brushstrokes in the same direction or the perpendicular direction. The latter will produce a hatchmark effect.
- Continue adding layers of decoupage glue until you are satisfied with the look (ex. 3). Then repeat the process of sealing with waterproof acrylic sealer, brushing on a layer and allowing it to dry. If using spray sealant, follow directions on can. With either, make sure you are in a well ventilated area and you follow the precautions on the product. Wait at least one day before adding the sealer to make sure the coasters are thoroughly dry. Each sealer has a different curing time; check for the appropriate drying time.
- When the coasters are completely sealed and dry, cut the felt to the appropriate size to match tiles. Use the heavy duty glue to affix the felt square to the bottom of the tile. Most heavy duty glues require adequate ventilation. Again, be sure to follow the manufacturer's directions and precautions. The same process applies to the use of rolled cork board. Wait a few days before packaging to make sure the adhesive no longer has an odor.
- Stack and package coasters. Add a tag with a printed message.
Music Musings
Lately, I've been spending so much time researching the music options for our wedding. I have an extensive spreadsheet that continues to grow with all of the dj possibilities. I'm amazed at the price variabililty among djs. I've received bids anywhere from $375 to $895 for 3-4 hours. Our budget for music is about $400, so almost all of the djs are immediately excluded as possibilities. 
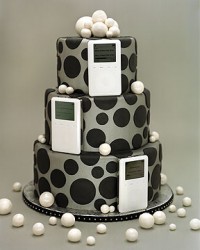
The ipod wedding is sounding better and better the more I learn about the exorbitant costs of hiring musicians and/or djs. Who knows, maybe we could even decorate our cake with music...

(Source)
It would be so convenient to to create our own personalized playlists for the wedding. Music for the pre-ceremony, ceremony, cocktail hour, and dinner would be pretty simple.
(Source)My only question revolves around music during the dancing portion of the reception. I want our guests to rock out and have a blast at our wedding. But will the evening flow without an MC?
(Source)How can we make sure everyone has an amazing time at our party?!

(Source)
Wednesday, October 7, 2009
MOH's Bachelorette Party
My Maid of Honor Corrine is days away from becoming a Matron of Honor. Since we're flying to Costa Rica for the wedding festivities this Saturday, last weekend was her last weekend of "freedom". Twenty one ladies gathered in Highlands Ranch to celebrate Corrine in fine style. We dressed in Corrine's favorite color Teal

While the bride wore white.
The party started at La Sandia for Mexican food and margaritas and then took over LoDo's Highlands Ranch for some fun dancing.
Lovely ladies celebrating Corrine!

While the bride wore white.
The party started at La Sandia for Mexican food and margaritas and then took over LoDo's Highlands Ranch for some fun dancing.
Lovely ladies celebrating Corrine!Thursday, October 1, 2009
Wait, this isn't just my wedding?!
Up until a couple weeks ago, I have been running with all of the wedding planning. I'd read in countless wedding magazines about the importance of including one's fiance in the wedding planning to make it a joint effort. However, my fiance is not really that type of guy. Yes, I dragged him to a few bridal shows and he was a trooper! But he is not particularly interested in the wedding event itself. I think his main objectives are A) marry me and B) get to the beach at our honeymoon destination ASAP.

So I was surprised when he offered to design our Save the Dates a couple weeks ago. He did a wonderful job and I only made a few minor adjustments before signing off on them. Rich also started researching caterers after our first attempt at hiring a caterer fizzled (more on that later). Then last night, he announced that we needed an Excel spreadsheet detailing all objectives and who is responsible for each. I was floored.
Why in the world was he suddenly interested?! Now I'm wondering if this is a common occurrence. Do guys start out aloof and indifferent in the planning process only to want to become involved as the wedding date fast approaches?

So I was surprised when he offered to design our Save the Dates a couple weeks ago. He did a wonderful job and I only made a few minor adjustments before signing off on them. Rich also started researching caterers after our first attempt at hiring a caterer fizzled (more on that later). Then last night, he announced that we needed an Excel spreadsheet detailing all objectives and who is responsible for each. I was floored.
Why in the world was he suddenly interested?! Now I'm wondering if this is a common occurrence. Do guys start out aloof and indifferent in the planning process only to want to become involved as the wedding date fast approaches?
Tuesday, September 29, 2009
DIY Project: Handmade Clutches
Recently, I was perusing Classic Bride and found the most wonderful How To post. Back in July, Classic Bride held a DIY contest & the winner, Emily, submitted a fantastic & simple project for making bridesmaid clutches. I love this idea & want to personalize it to my bridesmaids as gifts. Depending on how the actual project goes, I may make some for our Mothers of the Bride & Groom! On to the wonderful project!
Bridesmaid Clutches
Supplies:
- purse frame
- fabric (Upholstery weight fabric gives the clutches more stiffness)
- interfacing
- thread
- sewing machine
- cardboard
Step 1
Pick out your frame and use it as a guide to make a pattern. This may take some experimenting.
Supplies:
- purse frame
- fabric (Upholstery weight fabric gives the clutches more stiffness)
- interfacing
- thread
- sewing machine
- cardboard
Step 1
Pick out your frame and use it as a guide to make a pattern. This may take some experimenting.
Step 2
Use your pattern to cut the fabric. Do this twice-once for the outside of the clutch and once for the inside.
Step 3
Also cut the pattern out of the interfacing.
Step 4
Iron the interfacing to the back of each piece of fabric.
Step 5
Put the fabric back-to-back
Step 6
Using the frame as a guide, fold over the fabric to hem. Iron to keep in place and then sew! Be careful to sew as close to the edge as possible so the stitches will stay under the frame.
Step 7
Do the same for the other sides.
Step 8
Attach tiny pieces of cardboard to the edges with strong glue. The cardboard helps to fill the frame and is useful for gluing. Allow to dry.
Step 9
Now add more glue to the other side of the cardboard and fit into the frame. I use a flathead screwdriver to make sure that all of the fabric is pushed into the frame.
Step 10
Rub the glue off the frame! Now you have beautiful clutches to match your beautiful bridesmaids!
Emily also has her own blog.Rub the glue off the frame! Now you have beautiful clutches to match your beautiful bridesmaids!
Subscribe to:
Posts (Atom)